LettermintLettermint
  • Knowledge base
  • Community
  • Changelog
  • Support
  • Documentation
  • Sending API
  • Team API
Getting started
Guides
    Node.jsPHPPythonGoLaravelMagento 2NuxtJava
    SMTP
Platform
Resources
Guides

Magento 2

1. Installation

Install the package via Composer:

TerminalCode
composer require lettermint/lettermint-magento2

After installation, run the Magento setup commands:

TerminalCode
bin/magento setup:upgrade bin/magento setup:di:compile bin/magento cache:clean

2. Configuration

Make sure you have your API token ready, which you can find in your project settings.

Finding the Settings

Navigate to Stores → Settings → Configuration. Then look for Lettermint in the sidebar.
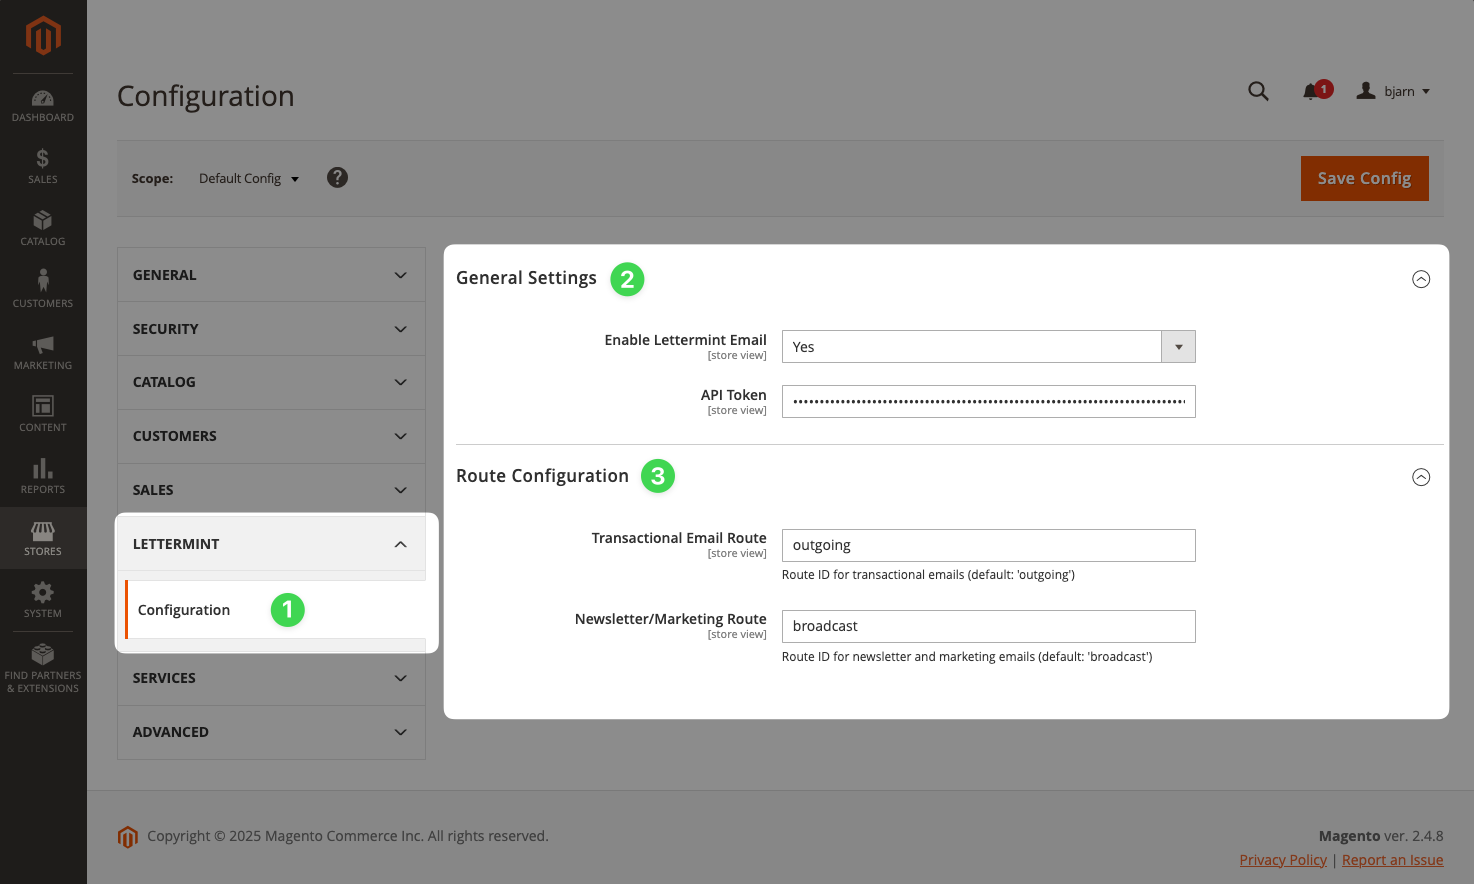
Magento 2 admin settings for the Lettermint module

General Settings

  1. Set Enable Lettermint Email to Yes
  2. Enter your project's API token in the API Token field
  3. Save the configuration

Route Configuration (Optional)

Configure which routes handle different email types:

  • Transactional Email Route: Used for system emails (password resets, order confirmations, invoices, track & trace updates)
  • Newsletter/Marketing Route: Used for newsletter emails sent via Marketing → Newsletter Queue

The defaults work for most setups. Only configure custom routes if you need to separate email traffic for analytics or deliverability purposes.

3. Sending Emails

Automatic Transactional Emails

Once configured, all Magento transactional emails automatically route through Lettermint:

  • Order confirmations
  • Shipping notifications
  • Password reset emails
  • Customer account emails
  • Invoice and credit memo emails

No code changes required - just configure and you're ready.

Testing Your Setup

Verify the integration works by triggering a test email:

  1. Go to Marketing → Communications → Email Templates
  2. Create or edit a template
  3. Click Preview Template and send a test email

Or trigger a password reset from the customer login page to test transactional emails.

Programmatic Emails

Send emails programmatically using Magento's transport builder:

Code
<?php namespace YourVendor\YourModule\Controller; use Magento\Framework\App\Action\Action; use Magento\Framework\App\Action\Context; use Magento\Framework\Mail\Template\TransportBuilder; use Magento\Store\Model\StoreManagerInterface; class SendEmail extends Action { public function __construct( Context $context, private TransportBuilder $transportBuilder, private StoreManagerInterface $storeManager ) { parent::__construct($context); } public function execute() { $storeId = $this->storeManager->getStore()->getId(); $transport = $this->transportBuilder ->setTemplateIdentifier('your_email_template') ->setTemplateOptions([ 'area' => \Magento\Framework\App\Area::AREA_FRONTEND, 'store' => $storeId, ]) ->setTemplateVars([ 'customer_name' => 'John Doe', 'order_id' => '100000123', ]) ->setFromByScope('general') ->addTo('customer@example.com', 'John Doe') ->getTransport(); $transport->sendMessage(); } }

Adding Custom Headers

Add Lettermint headers for metadata and tags using a plugin:

Code
<?php namespace YourVendor\YourModule\Plugin; use Magento\Framework\Mail\TransportInterface; class TransportPlugin { public function beforeSendMessage(TransportInterface $transport) { $message = $transport->getMessage(); // Add metadata $message->getHeaders()->addHeaderLine( 'X-LM-Metadata-order_id', '100000123' ); // Add a tag $message->getHeaders()->addHeaderLine( 'X-LM-Tag', 'order-confirmation' ); // Specify a route $message->getHeaders()->addHeaderLine( 'X-Lettermint-Route', 'transactional' ); } }

Register the plugin in etc/di.xml:

XMLCode
<?xml version="1.0"?> <config xmlns:xsi="http://www.w3.org/2001/XMLSchema-instance" xsi:noNamespaceSchemaLocation="urn:magento:framework:ObjectManager/etc/config.xsd"> <type name="Magento\Framework\Mail\TransportInterface"> <plugin name="lettermint_transport_headers" type="YourVendor\YourModule\Plugin\TransportPlugin"/> </type> </config>

Metadata is included in webhook payloads but not added to the actual email headers. Use it for tracking and analytics purposes.

4. Troubleshooting

Emails Not Sending

  1. Verify Enable Lettermint Email is set to Yes
  2. Check your API token is correct
  3. Review logs in var/log/system.log
  4. Ensure the module is enabled: bin/magento module:status Lettermint_Email

Clear Cache After Changes

After configuration changes:

TerminalCode
bin/magento cache:clean config

Next Steps

Tags

Organize and filter emails with tags.

Tracking

Track opens, clicks, and deliverability.

Webhooks

Receive real-time delivery notifications.

SMTP Alternative

Send via SMTP instead of the API.

GitHub Repository

Find the complete source code, report issues, or contribute on GitHub.

Last modified on May 11, 2026
LaravelNuxt
On this page
  • 1. Installation
  • 2. Configuration
    • Finding the Settings
    • General Settings
    • Route Configuration (Optional)
  • 3. Sending Emails
    • Automatic Transactional Emails
    • Testing Your Setup
    • Programmatic Emails
    • Adding Custom Headers
  • 4. Troubleshooting
    • Emails Not Sending
    • Clear Cache After Changes
  • Next Steps
PHP
PHP