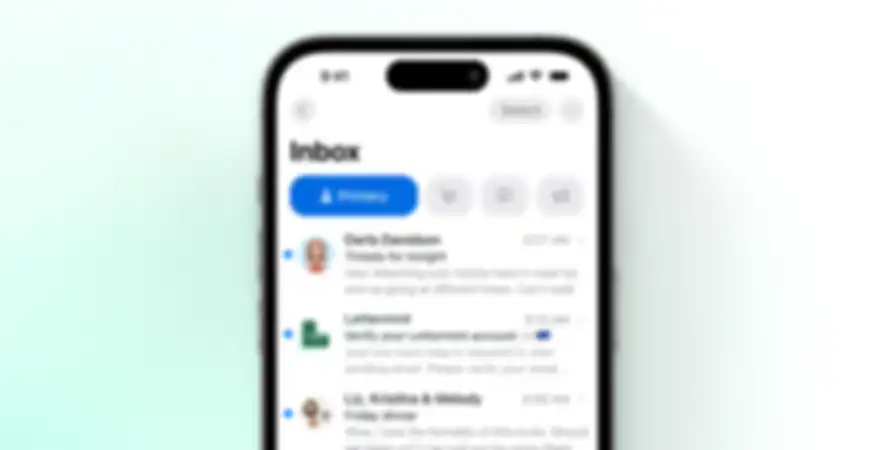
Want your emails to stand out in Apple Mail? With Apple Branded Mail, your business logo is automatically displayed to recipients using Apple Mail. Instead of a generic image, they'll immediately see your brand identity. In this guide, we'll explain step by step how to set this up for free for your domain, subdomain or email address.
What is Apple Branded Mail?
With Apple Branded Mail, you ensure your logo is visible in Apple Mail. This provides instant recognition and a professional appearance, instead of an automatically generated image. Apple Branded Mail requires a free Apple Business Connect account and a valid DMARC record in your DNS.
Unlike BIMI - another way to display a logo - Apple Branded Mail is completely free. BIMI ensures your logo is also visible in Gmail, Outlook and other mail clients, but this comes with requirements and costs. Apple Branded Mail is therefore a nice stepping stone to show your logo to Apple users.
A logo via Branded Mail is only visible in the Apple Mail app on iOS 16, macOS Ventura 13 and iPadOS 16 or higher.
How do I set up Apple Branded Mail?
Setting up Apple Branded Mail consists of two steps. If you're sending emails with Lettermint, there's a good chance you've already completed step 1, as a DMARC record is also required when adding a domain in Lettermint.
In another article, we explain what DMARC is. Read more in our article 'What is DMARC'.
1. Set up DMARC
To ensure your logo is displayed in Apple Mail, Apple requires a DMARC record in your domain's DNS. Besides the DMARC being correct, Apple requires specific values in this record, namely the Policy and Percentage.
- The value v (Version) must be DMARC1.
- The value p (Policy) must be quarantine or reject.
- The value pct (Percentage) must be 100.
Check DMARC
Enter your domain below and check if the DMARC record is correctly configured. If you're already using Lettermint, it may already be correctly configured. Then only check if the Policy and Percentage are correctly set.
Want a correct DMARC example for Apple Branded Mail? Enter lettermint.co.
Is your DMARC record correctly configured? Then we can proceed with setting up your business in Apple Business Connect.
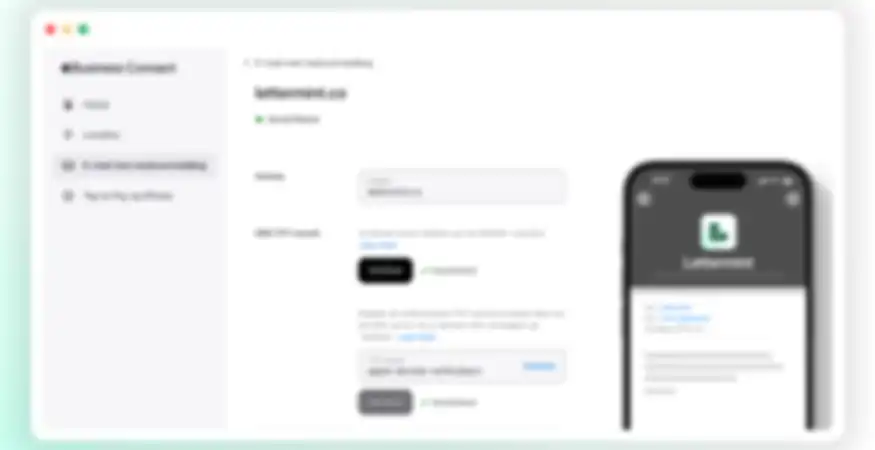
2. Apple Business Connect
With an Apple Business Connect account, you can manage brands and businesses and provide information used in official Apple apps like Apple Maps, Apple Mail and Apple Pay.
Don't have an account yet? Create a free Apple Business Connect account.
Add business
Add your business via the sidebar in the menu. Enter all details such as business name, country, category and website. Complete any verification questions.
Your business now appears under 'Businesses' in Business Connect. Here you also set the logo that will ultimately be used for Branded Email.
Branded Email
Click on Branded Email in the sidebar and choose to add an existing business. Select the business you created in the previous step and fill in all fields.
For verification, Apple needs a TXT record in your domain's DNS. This is required in addition to the earlier DMARC record.
Verify
Depending on the country, you may need to complete some additional verifications. After your business and domain/email address in Business Connect have the status 'Verified', your logo will be displayed in Apple Mail to recipients from now on.
Apple Branded Mail doesn't work in some languages yet. Recipients see your brand only when the device and iCloud are set with the default language as English, Portuguese, French, Italian, German, Spanish or Chinese.
Lettermint and Apple Branded Mail
All emails you send with your domain or email address that you've added to Apple will display a logo. This means emails you send with Lettermint will also display a logo.
The great thing is that this works automatically for all your emails via Lettermint - both transactional emails and broadcast emails. You don't need any additional settings in Lettermint itself. Once Apple Business Connect is configured, your logo appears for Apple Mail users for a more professional appearance.
For more information, you can consult Apple's guide.