# Magento 2
## 1. Installation
Install the package via Composer:
```bash
composer require lettermint/lettermint-magento2
```
After installation, run the Magento setup commands:
```bash
bin/magento setup:upgrade
bin/magento setup:di:compile
bin/magento cache:clean
```
## 2. Configuration
Make sure you have your API token ready, which you can find in your [project settings](https://dash.lettermint.co/projects).
### Finding the Settings
Navigate to **Stores** → **Settings** → **Configuration**. Then look for **Lettermint** in the sidebar.
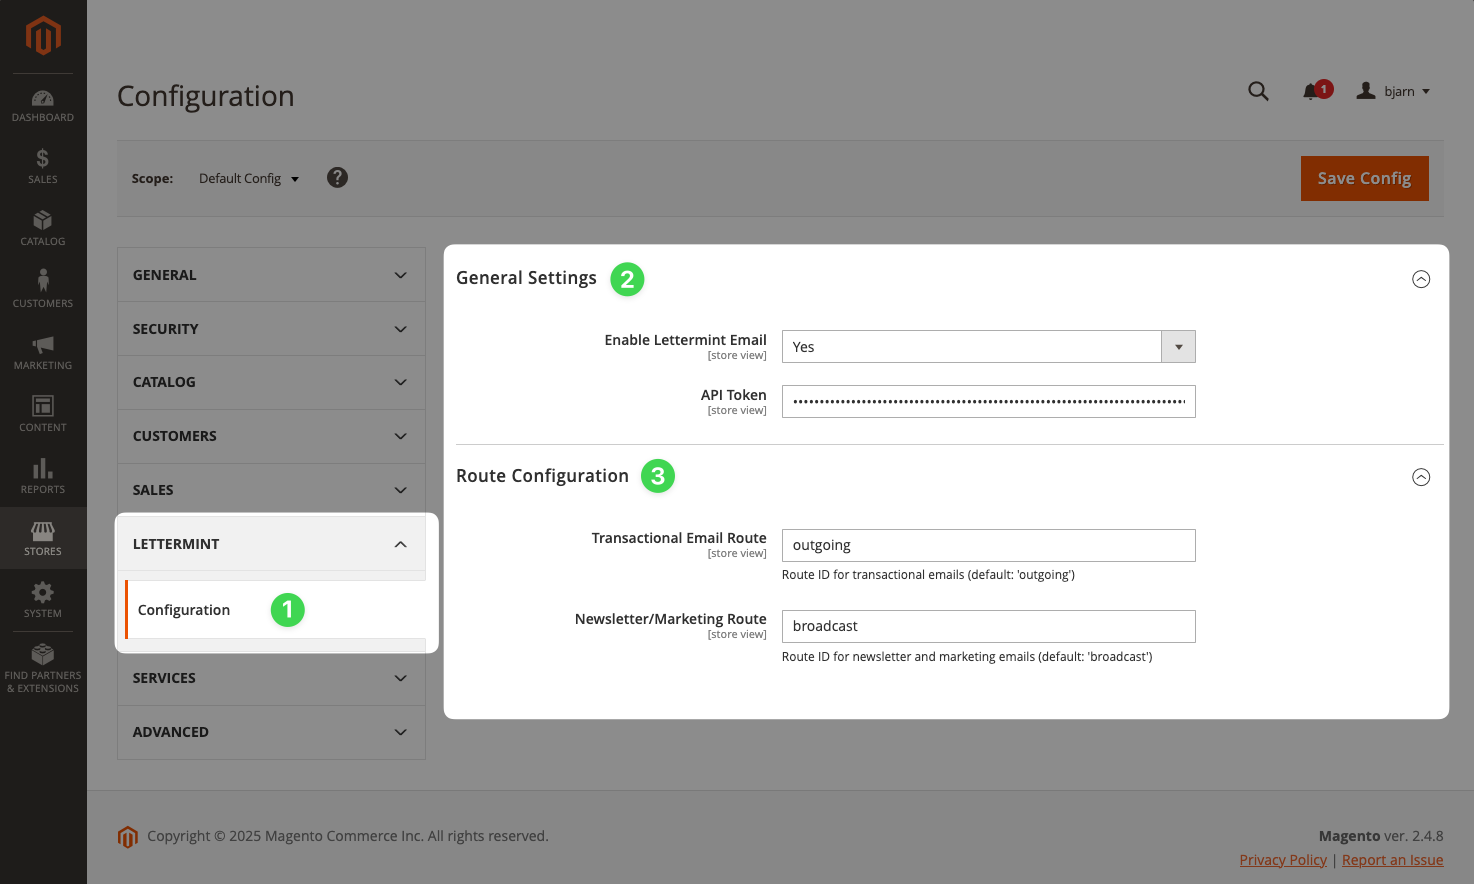 ### General Settings
1. Set **Enable Lettermint Email** to **Yes**
2. Enter your project's API token in the **API Token** field
3. Save the configuration
### Route Configuration (Optional)
Configure which routes handle different email types:
- **Transactional Email Route**: Used for system emails (password resets, order confirmations, invoices, track & trace updates)
- **Newsletter/Marketing Route**: Used for newsletter emails sent via **Marketing** → **Newsletter Queue**
:::tip
The defaults work for most setups. Only configure custom routes if you need to separate email traffic for analytics or deliverability purposes.
:::
## 3. Sending Emails
### Automatic Transactional Emails
Once configured, all Magento transactional emails automatically route through Lettermint:
- Order confirmations
- Shipping notifications
- Password reset emails
- Customer account emails
- Invoice and credit memo emails
No code changes required - just configure and you're ready.
### Testing Your Setup
Verify the integration works by triggering a test email:
1. Go to **Marketing** → **Communications** → **Email Templates**
2. Create or edit a template
3. Click **Preview Template** and send a test email
Or trigger a password reset from the customer login page to test transactional emails.
### Programmatic Emails
Send emails programmatically using Magento's transport builder:
```php
storeManager->getStore()->getId();
$transport = $this->transportBuilder
->setTemplateIdentifier('your_email_template')
->setTemplateOptions([
'area' => \Magento\Framework\App\Area::AREA_FRONTEND,
'store' => $storeId,
])
->setTemplateVars([
'customer_name' => 'John Doe',
'order_id' => '100000123',
])
->setFromByScope('general')
->addTo('customer@example.com', 'John Doe')
->getTransport();
$transport->sendMessage();
}
}
```
### Adding Custom Headers
Add Lettermint headers for metadata and tags using a plugin:
```php
getMessage();
// Add metadata
$message->getHeaders()->addHeaderLine(
'X-LM-Metadata-order_id',
'100000123'
);
// Add a tag
$message->getHeaders()->addHeaderLine(
'X-LM-Tag',
'order-confirmation'
);
// Specify a route
$message->getHeaders()->addHeaderLine(
'X-Lettermint-Route',
'transactional'
);
}
}
```
Register the plugin in `etc/di.xml`:
```xml
```
:::note
Metadata is included in webhook payloads but not added to the actual email headers. Use it for tracking and analytics purposes.
:::
## 4. Troubleshooting
### Emails Not Sending
1. Verify **Enable Lettermint Email** is set to **Yes**
2. Check your API token is correct
3. Review logs in `var/log/system.log`
4. Ensure the module is enabled: `bin/magento module:status Lettermint_Email`
### Clear Cache After Changes
After configuration changes:
```bash
bin/magento cache:clean config
```
## Next Steps
Organize and filter emails with tags.
Track opens, clicks, and deliverability.
Receive real-time delivery notifications.
Send via SMTP instead of the API.
Find the complete source code, report issues, or contribute on GitHub.
### General Settings
1. Set **Enable Lettermint Email** to **Yes**
2. Enter your project's API token in the **API Token** field
3. Save the configuration
### Route Configuration (Optional)
Configure which routes handle different email types:
- **Transactional Email Route**: Used for system emails (password resets, order confirmations, invoices, track & trace updates)
- **Newsletter/Marketing Route**: Used for newsletter emails sent via **Marketing** → **Newsletter Queue**
:::tip
The defaults work for most setups. Only configure custom routes if you need to separate email traffic for analytics or deliverability purposes.
:::
## 3. Sending Emails
### Automatic Transactional Emails
Once configured, all Magento transactional emails automatically route through Lettermint:
- Order confirmations
- Shipping notifications
- Password reset emails
- Customer account emails
- Invoice and credit memo emails
No code changes required - just configure and you're ready.
### Testing Your Setup
Verify the integration works by triggering a test email:
1. Go to **Marketing** → **Communications** → **Email Templates**
2. Create or edit a template
3. Click **Preview Template** and send a test email
Or trigger a password reset from the customer login page to test transactional emails.
### Programmatic Emails
Send emails programmatically using Magento's transport builder:
```php
storeManager->getStore()->getId();
$transport = $this->transportBuilder
->setTemplateIdentifier('your_email_template')
->setTemplateOptions([
'area' => \Magento\Framework\App\Area::AREA_FRONTEND,
'store' => $storeId,
])
->setTemplateVars([
'customer_name' => 'John Doe',
'order_id' => '100000123',
])
->setFromByScope('general')
->addTo('customer@example.com', 'John Doe')
->getTransport();
$transport->sendMessage();
}
}
```
### Adding Custom Headers
Add Lettermint headers for metadata and tags using a plugin:
```php
getMessage();
// Add metadata
$message->getHeaders()->addHeaderLine(
'X-LM-Metadata-order_id',
'100000123'
);
// Add a tag
$message->getHeaders()->addHeaderLine(
'X-LM-Tag',
'order-confirmation'
);
// Specify a route
$message->getHeaders()->addHeaderLine(
'X-Lettermint-Route',
'transactional'
);
}
}
```
Register the plugin in `etc/di.xml`:
```xml
```
:::note
Metadata is included in webhook payloads but not added to the actual email headers. Use it for tracking and analytics purposes.
:::
## 4. Troubleshooting
### Emails Not Sending
1. Verify **Enable Lettermint Email** is set to **Yes**
2. Check your API token is correct
3. Review logs in `var/log/system.log`
4. Ensure the module is enabled: `bin/magento module:status Lettermint_Email`
### Clear Cache After Changes
After configuration changes:
```bash
bin/magento cache:clean config
```
## Next Steps
Organize and filter emails with tags.
Track opens, clicks, and deliverability.
Receive real-time delivery notifications.
Send via SMTP instead of the API.
Find the complete source code, report issues, or contribute on GitHub.